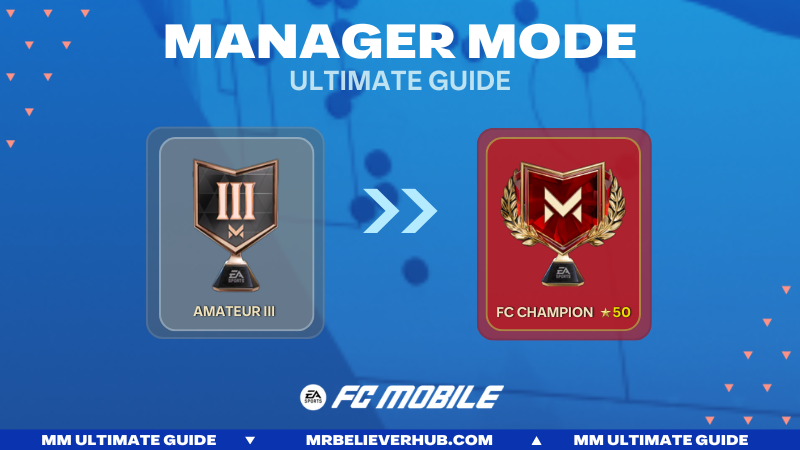
Manager Mode Guide
🏆 ROAD TO FC CHAMPION IN MM 🏆
Hello Believers, do you know that Manager Mode is a mode where you don’t need much effort to reach the FC Champion rank? Manager Mode is a completely different mode in FC Mobile where tactics matter more than gameplay. You don’t need to waste time by playing the game manually — your brain is the key here.
This guide will help you with a complete Manager Mode strategy, crafted with insights from FC Champion-ranked Pro players. So, without any further delay, let’s begin!
🧠 What is Manager Mode?
Manager Mode is a PvP Division Rivals game mode where two teams face off against each other. Unlike in H2H or VSA, the player does not directly control the players. Instead, you set tactics and formations that your players follow throughout the match.
It is widely considered the easiest game mode to grind because you don’t have to actively play. You can simply set a match limit for your team to automatically complete games while you sleep or handle real-life tasks.
🔄 Matchmaking Information
In the new Rivals system of FC Mobile, the way matchmaking works has completely changed compared to the old cup-based structure. Earlier, lowering your Team Rating with bronze squads was a very popular method, since your matchmaking depended heavily on cups and fans. Now, however, that method is completely outdated ❌. The introduction of the Stars + Bonus Points system has reshaped progress in Manager Mode. Instead of only focusing on cups, every match you play contributes toward your promotion through the stars you earn, as well as the bonus points you accumulate. This means that even if you lose a game, it is no longer wasted—because you still earn bonus points, and eventually those points convert into stars ⭐, ensuring that you are always moving forward.
If you are below Legendary 3 rank, the focus should not be on lowering your team rating anymore. Instead, what matters is consistency. Every game you play has some value, whether you win, draw, or lose. Winning obviously grants you the maximum stars, but even in defeat, bonus points keep stacking, and sooner or later they push you into gaining another star. This system allows steady progress without the need to manipulate your squad rating. Being patient and active will benefit you more than trying to trick the system, because matchmaking is determined primarily by your division and your star count rather than your team’s overall rating.
If you are below Legendary 1 rank, you should also keep your rating balanced, rather than forcing it down with a bronze squad. The idea of lowering to 300K or 500K rating is irrelevant in the current system. What matters is having a competitive team that suits Manager Mode tactics, because strong tactical play will secure consistent stars and allow you to maximize streaks. Bonus points will cover you when you fall short, and shields will protect your hard-earned progress. This is why even during tough streaks, you can eventually climb if you remain consistent.
The “Rating Lowering Method” has essentially died out because the new system ensures that every match has some form of reward. Dropping your rating now only weakens your squad and puts you at a disadvantage against balanced opponents. Instead, the smarter way forward is to build a well-rounded team, understand tactical counters, and stay active during daily and weekly resets where activity spikes. The climb is no longer about manipulating matchmaking—it’s about steady effort and calculated play 💪.
In short, the old cup-based system relied heavily on manipulating your rating to find weaker opponents, but the new Stars + Bonus Points system guarantees progress for everyone. Losses are no longer wasted, draws still give you momentum, and wins maximize your growth. With this structure, climbing to higher ranks has become less about tricks and more about persistence, planning, and timing.
👥 How To Choose Players / Build A Team
In this section, we will guide you on how to build a strong team for Manager Mode by teaching you how to choose players properly.
Your team should be filled with high OVR and meta players to ensure the best performance.
🎯 Important Factors to Focus on While Selecting a Player
✨ Essential Traits
Players should have important traits because they significantly boost performance in-game, influencing on-field decisions, positioning, and more. For example, a CAM with the trait ‘Long Shot Taker’ will often take accurate long shots. Therefore, traits are very beneficial in Manager Mode. Choosing players with the right traits can greatly enhance overall team effectiveness.
Note: All players should be Red Rank / Level 25 trained for competitive performance.
⚽ Important Factors for Attackers
- Outside Foot Shot (Trait)
- 5★ Weak Foot – To reduce hesitation and improve shot accuracy
- Long Shot Taker (Trait)
- Power Header (Trait)
- High OVR – Ensures meta usability and better in-game stats
🔗 Important Factors While Choosing Midfielders
- 5★ Weak Foot
- Playmaker (Trait)
- Flair (Trait)
- Long Shot Taker (Trait)
- Outside Foot Shot (Trait)
- Work Rates:
- CM: High/High
- CDM: High/High or Medium/High
- CAM: High/Medium
🛡️ Important Factors While Choosing Defenders
- Great Height – Preferably above 6’2″
- Strong Defensive Stats
- Power Header (Trait)
- Dives Into Tackles (Trait)
- Physical (Trait)
🧤 Important Factors While Choosing a Goalkeeper
- Great Height – Preferably above 6’3″
- Long Thrower (Trait)
Note: It’s not compulsory for every player to have all the listed traits and stats, but at least 2–3 of them should be present for optimum performance.
⬆️⬇️ Promotion / Demotion
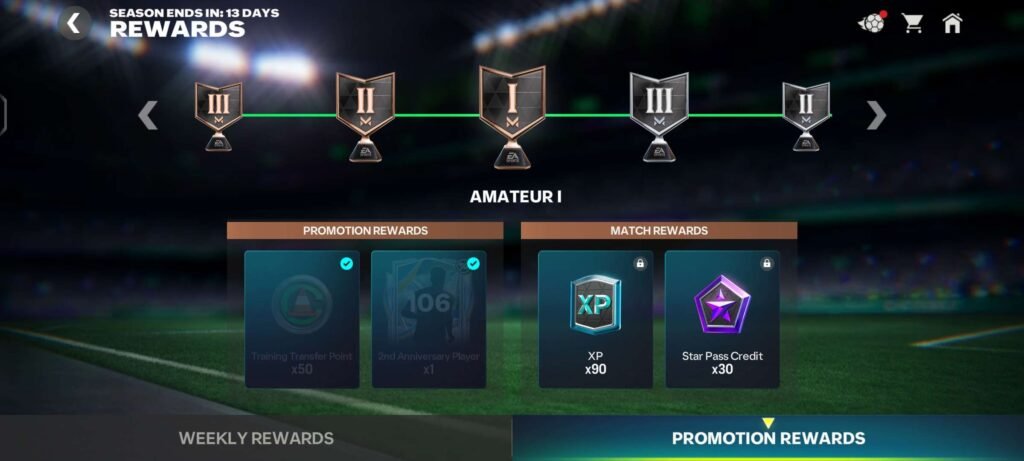
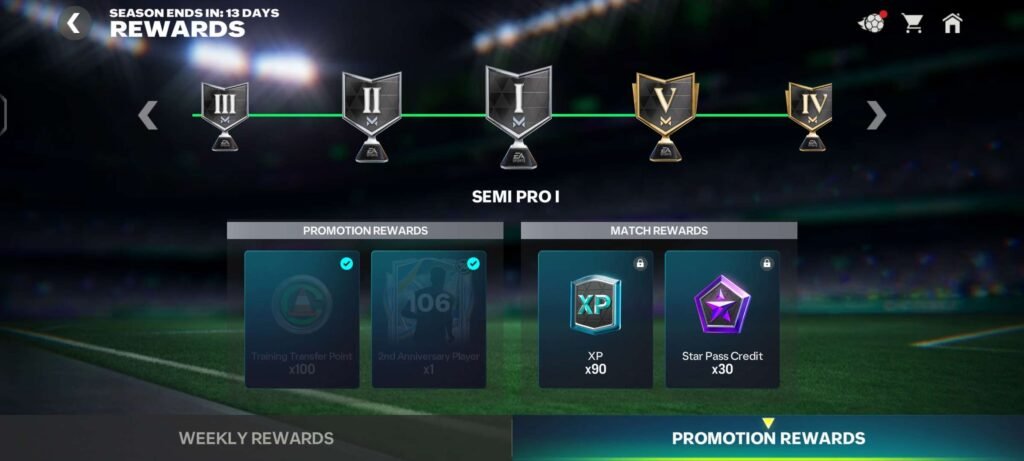
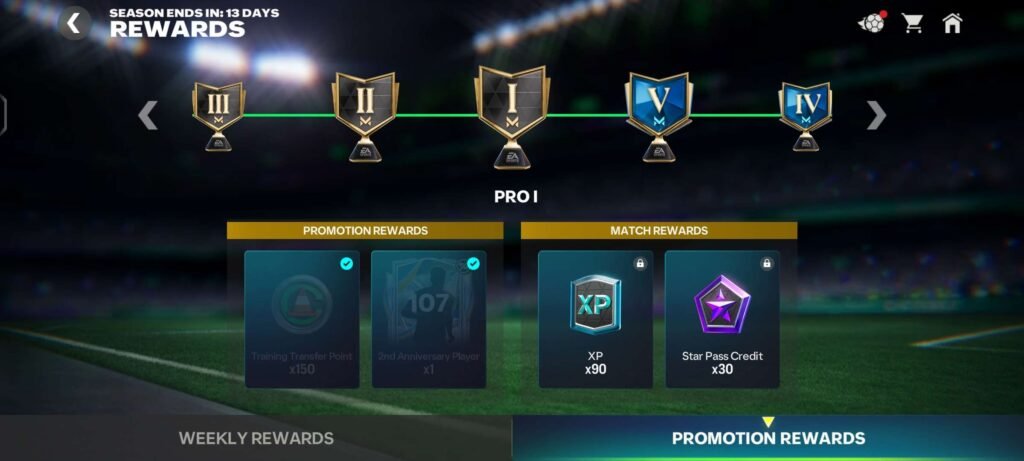
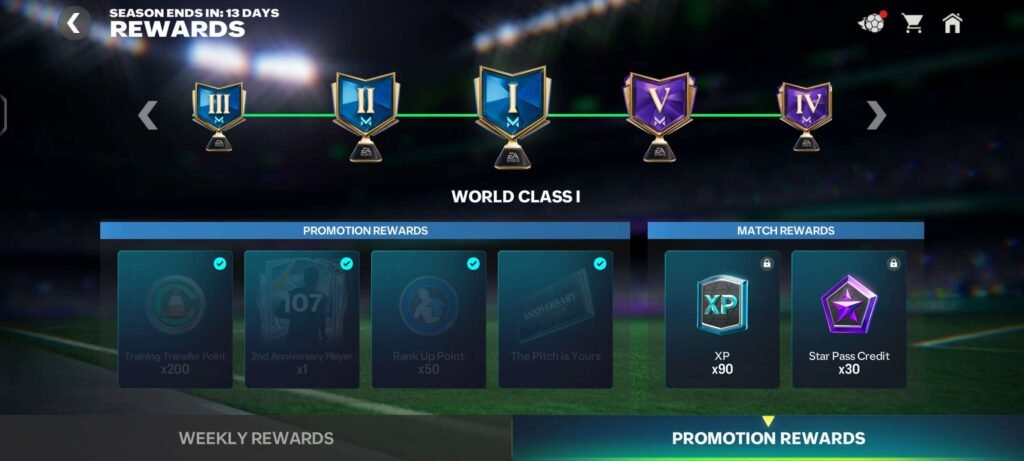
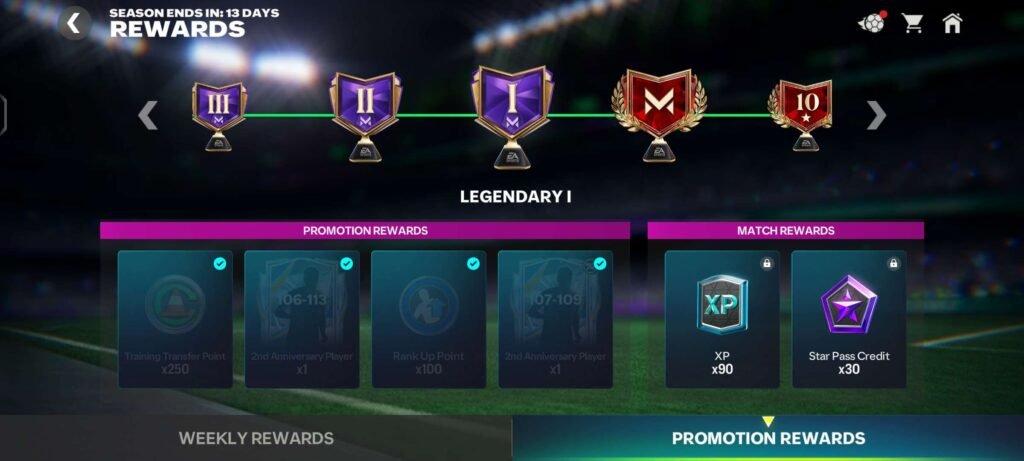
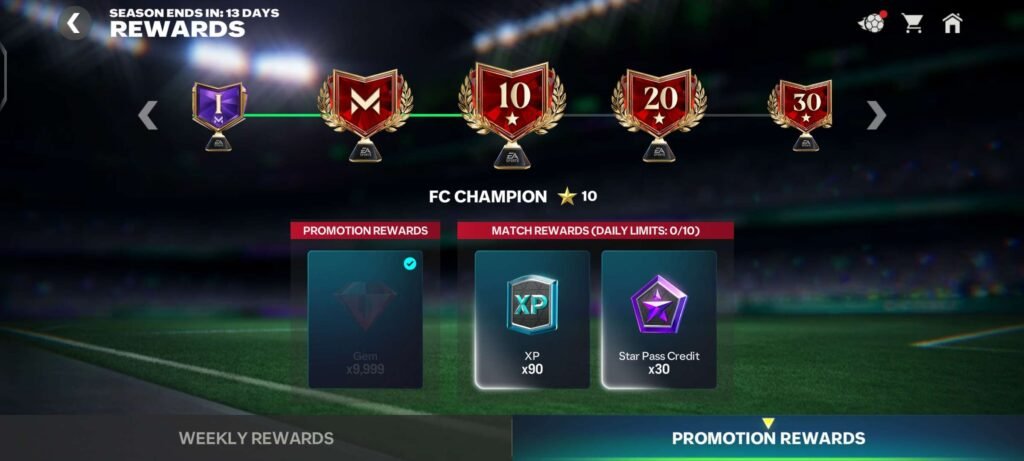
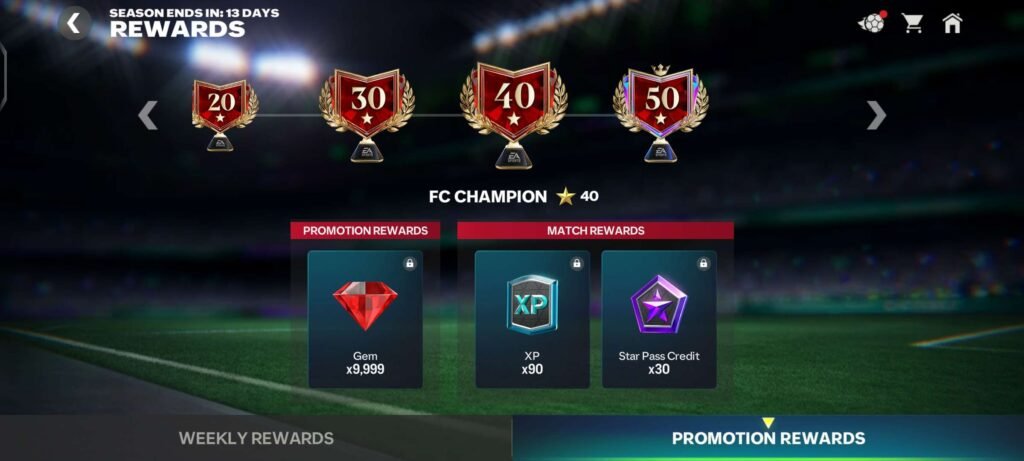
One of the biggest changes in the new Manager Mode system is how promotions and demotions work. Earlier, it used to be about a strict 10-game cycle where you needed a fixed number of points to go up, and failing meant either holding your division or getting demoted. But that system is gone now. Today, progression is fully based on the Stars you collect ⭐ along with the Bonus Points and Shields you earn along the way, which makes the climb much smoother and far less punishing.
How Promotion Works 🚀
Promotion no longer depends on winning a set number of games within a cycle. Instead, every victory directly adds stars to your division progress. Even if you don’t win, you’re still building toward promotion because of bonus points. Once enough bonus points are stacked, they eventually convert into stars too, meaning that every single match moves you forward in some way. This ensures that active players will always see progress, even if they struggle with a few tough losses.
Another key change is the addition of streak multipliers, where winning back-to-back matches gives you extra momentum and faster promotions. Shields also protect your stars when you lose, so one or two defeats won’t completely undo your progress like before. The whole system is designed to feel rewarding and less stressful, making promotion achievable for consistent players.
How Demotion Works ⬇️
Demotion has also been reworked to be more forgiving. Instead of losing divisions just because of one bad cycle, you now only risk demotion when your shields are completely gone and you continue losing matches without recovering stars. This means you have much more room to recover from bad form before dropping down a rank. As long as you can bounce back with a few wins, your progress will be protected.
Key Takeaway 📌
The old “win 3 points, draw 1, lose 0” system is history. Now, it’s all about stars, bonus points, streaks, and shields. Promotions feel smoother, demotions are less punishing, and consistency is more important than perfection. If you keep playing regularly and stay smart with your tactics, you will keep climbing steadily no matter what.
| Division | Stars Needed for Promotion | Demotion Rule |
|---|---|---|
| Amateur III ➡️ Amateur II | 3 Stars | Protected by Shields |
| Amateur II ➡️ Amateur I | 3 Stars | Protected by Shields |
| Amateur I ➡️ Semi-Pro III | 3 Stars | Protected by Shields |
| Semi-Pro III ➡️ Semi-Pro II | 3 Stars | Protected by Shields |
| Semi-Pro II ➡️ Semi-Pro I | 3 Stars | Protected by Shields |
| Semi-Pro I ➡️ Pro V | 3 Stars | Protected by Shields |
| Pro V ➡️ Pro IV | 4 Stars | Lose stars if no shields left |
| Pro IV ➡️ Pro III | 4 Stars | Lose stars if no shields left |
| Pro III ➡️ Pro II | 4 Stars | Lose stars if no shields left |
| Pro II ➡️ Pro I | 4 Stars | Lose stars if no shields left |
| Pro I ➡️ World Class V | 5 Stars | Lose stars if no shields left |
| World Class V ➡️ World Class IV | 5 Stars | Lose stars, shields are useless |
| World Class IV ➡️ World Class III | 5 Stars | Lose stars, shields are useless |
| World Class III ➡️ World Class II | 5 Stars | Lose stars, shields are useless |
| World Class II ➡️ World Class I | 5 Stars | Lose stars, shields are useless |
| World Class I ➡️ Legendary V | 6 Stars | Lose stars, shields are useless |
| Legendary V ➡️ Legendary IV | 6 Stars | Lose stars, shields are useless |
| Legendary IV ➡️ Legendary III | 6 Stars | Lose stars, shields are useless |
| Legendary III ➡️ Legendary II | 6 Stars | Lose stars, shields are useless |
| Legendary II ➡️ Legendary I | 6 Stars | Lose stars, shields are useless |
| Legendary I ➡️ FC Champion | 7 Stars | Lose stars, shields are useless |
| FC Champion ➡️ FC Champion 10 Stars | 10 Stars | Lose stars but no demotion |
| FC Champion 10 Stars ➡️ FC Champion 20 Stars | 10 Stars | Lose stars but no demotion |
| FC Champion 20 Stars ➡️ FC Champion 30 Stars | 10 Stars | Lose stars but no demotion |
| FC Champion 30 Stars ➡️ FC Champion 40 Stars | 10 Stars | Lose stars but no demotion |
| FC Champion 40 Stars ➡️ FC Champion 50 Stars | 10 Stars | Lose stars but no demotion |
| FC Champion 50 Stars ➡️ Leaderboard Rank | Global Top Ranking | Maintain Top Rank daily |
🔑 Key MM Tips/Info
Here you will find all the crucial tips and information needed to perform well in Manager Mode.
🔴 Rank Ups / Training
Higher Player Rank Ups and Training Levels significantly improve performance in Manager Mode.
For example, a red-ranked Level 25 trained player will perform noticeably better than both a red-ranked Level 0 trained player and a purple-ranked Level 20 trained player.This is because rank ups and training boost player stats, which directly affects their match performance.
🔵 OVR
Your team Overall Rating (OVR) is extremely important for success in Manager Mode.
A higher OVR team generally performs better, just like in VSA, because they consist of better, stat-boosted players — which is key for automated matches.
🛠️ How to Play MM on Auto
- Tap on Auto
- Select the Division Reached
- Choose the Division You Want to Reach
- Tap on Save and it will start playing automatically
Make sure to disable screen sleep mode so the game continues running. You can run this overnight or anytime you’re away.
✅ Important Factors in Manager Mode (Ranked)
- Player Traits
- Manager Tactics
- Rank Ups / Training
- Team OVR
- Player Stats
- Alternate Positions (Players should be played in their main position or their alternate listed positions for 100% performance)
🗺️ Tactics for Top Formations
Here we will explore the most successful formations and their popular tactics for Manager Mode. These are just recommendations based on observations and experience from Top 250 and FC Champion players.
💡 Why Are Tactics Important?
Tactics are a very important factor in Manager Mode. They directly influence your team’s playstyle, decision-making, and overall performance.
Your tactics should be suited to your chosen formation and how you like to play. While you can stick with the same setup throughout the match, it is often better to adapt tactics during the game depending on the situation.
For example, if you are winning 2-0, you should switch to a more defensive setup to secure the win and avoid conceding late goals.
📊 Why Formations Matter
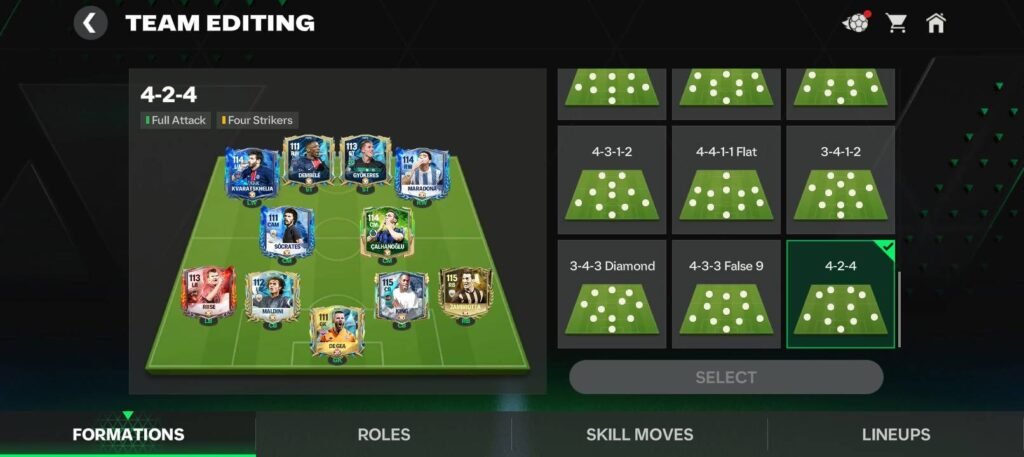
Formations shape your overall playstyle in Manager Mode. Below, we’ve listed some of the best and most used formations in the game. While you’re free to experiment, these formations generally offer the best balance and results.
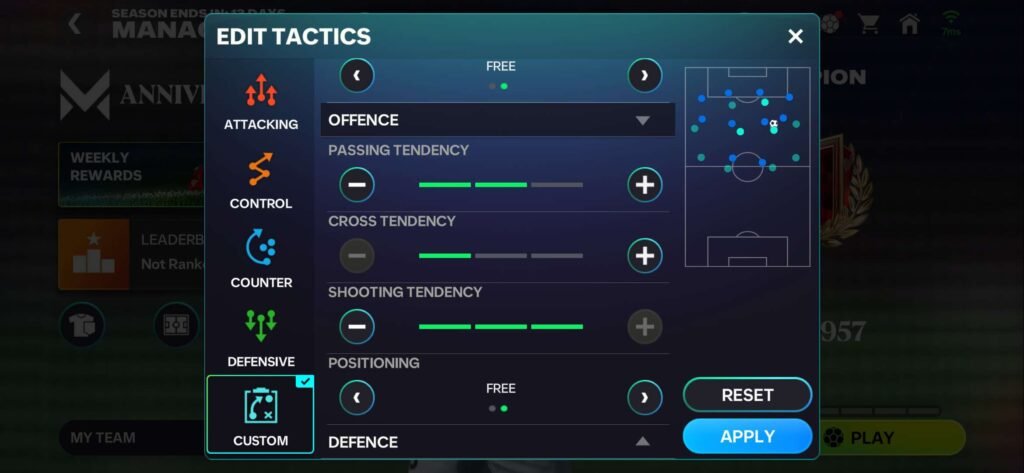
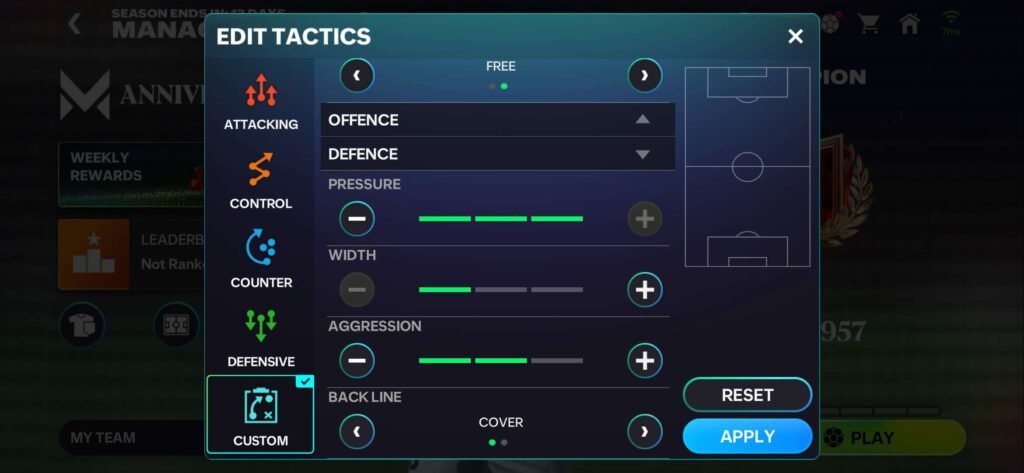
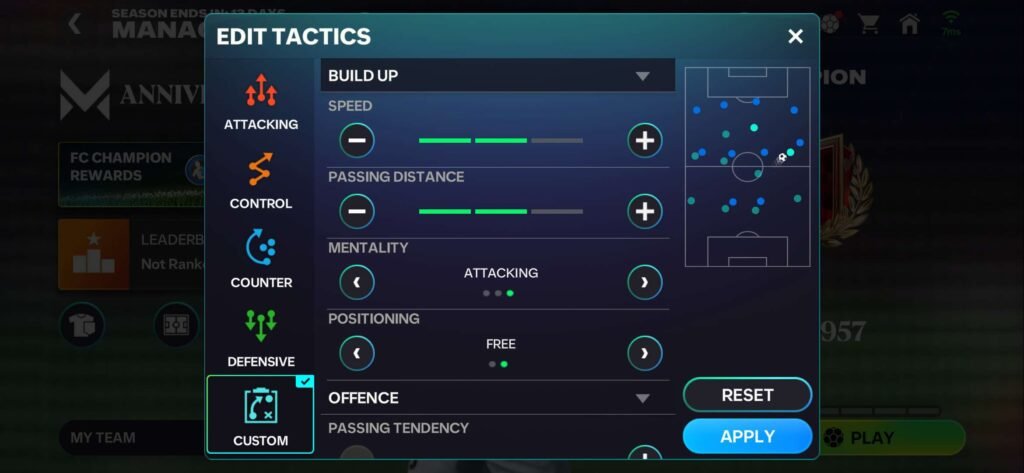
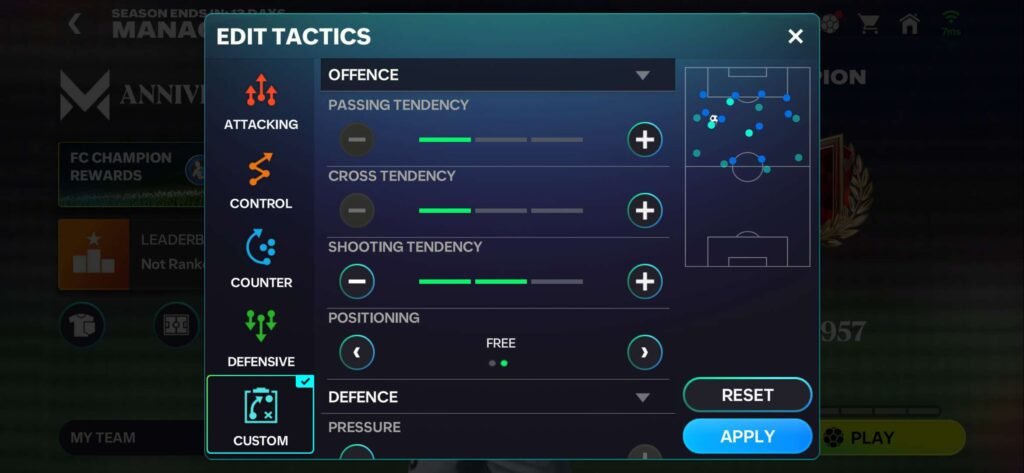
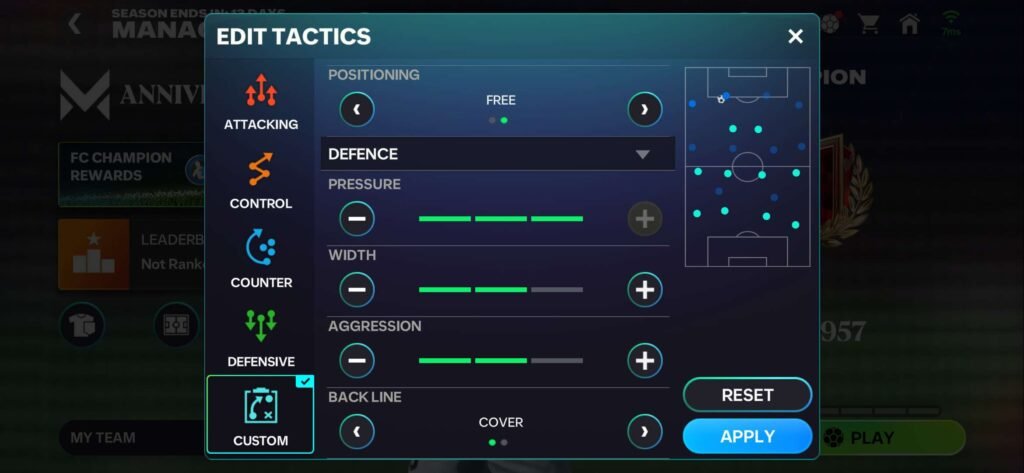
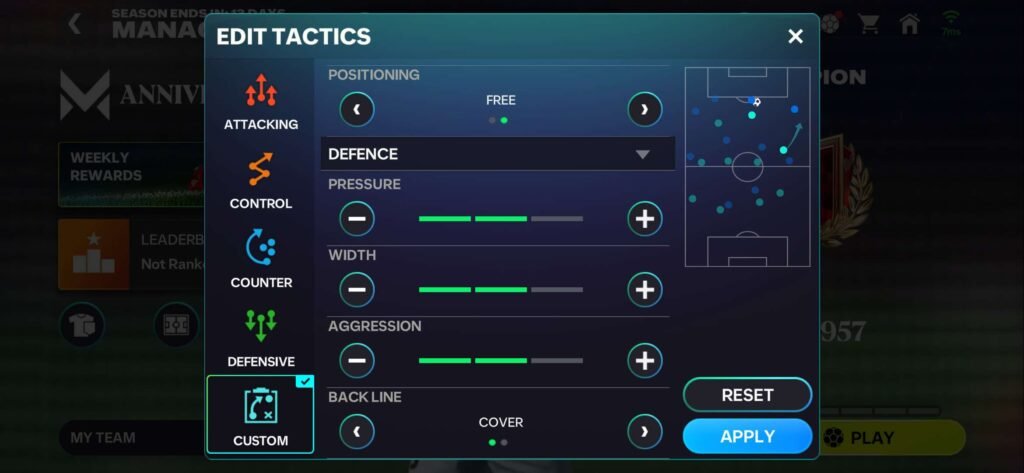
⚙️ How to Change Tactics?
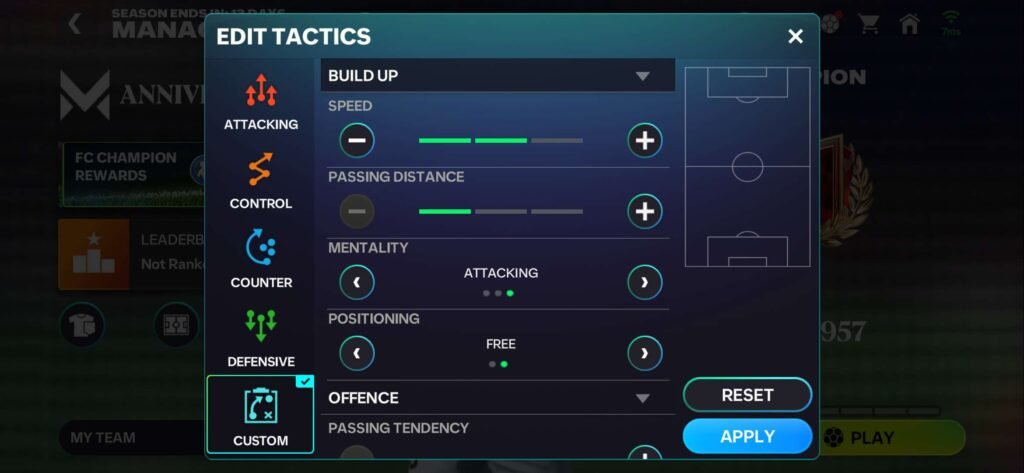
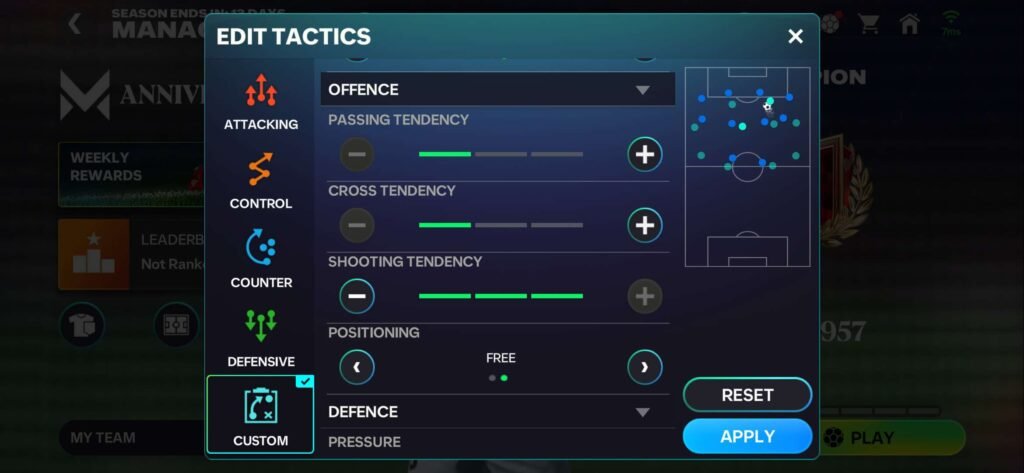
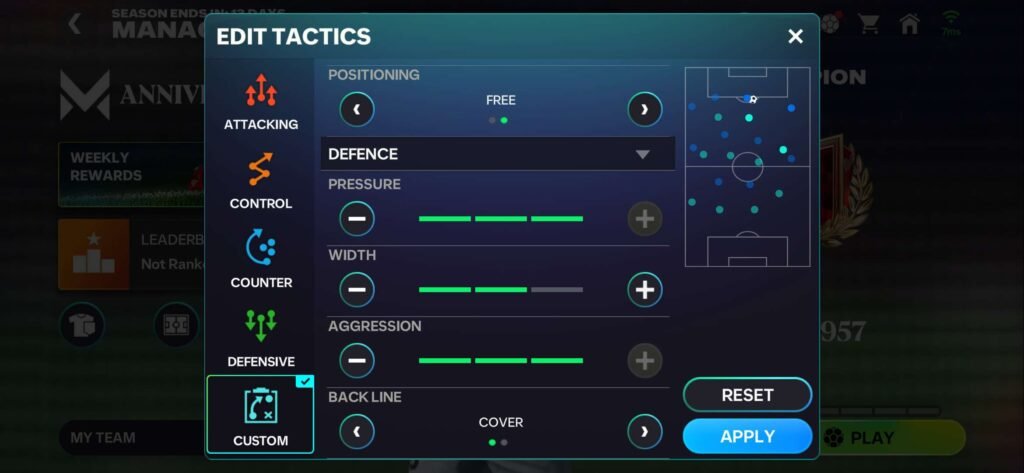
- Tap on Tactics in the Manager Mode screen
- Select your desired Custom Options
- Press Apply to save the tactic. This will apply for all your matches
⭐ Popular Formations & Recommended Tactics
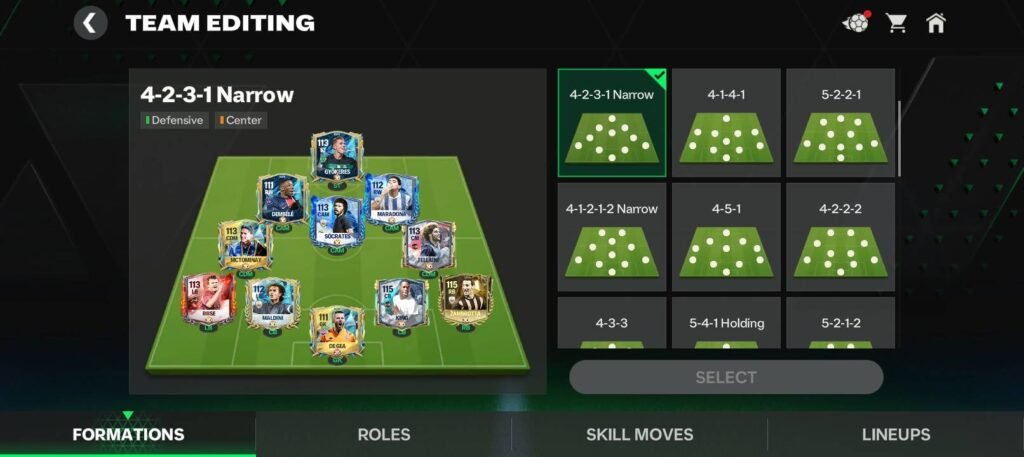
📌 4-2-3-1 Narrow
A balanced formation great for both attack and defense. Make sure to use a CDM with defensive traits and CAMs with traits like Long Shot Taker.
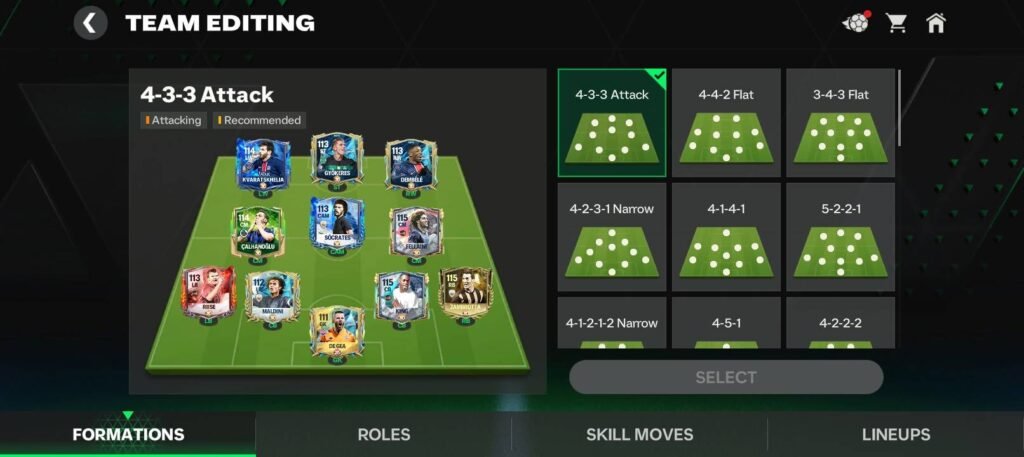
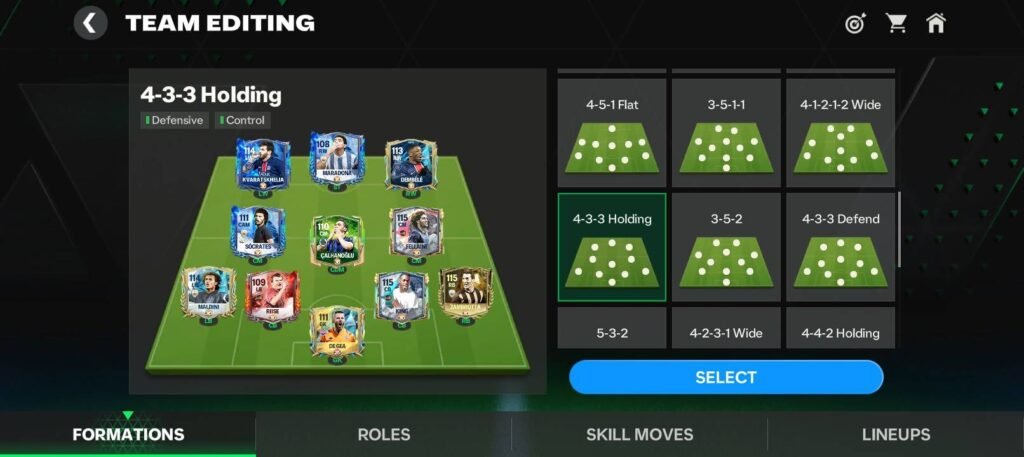
📌 4-3-3 Attack / 4-3-3 Holding
Highly effective for possession-based play. Use this when you want to maintain midfield control. Choose playmakers in the midfield and fast wingers for better success.
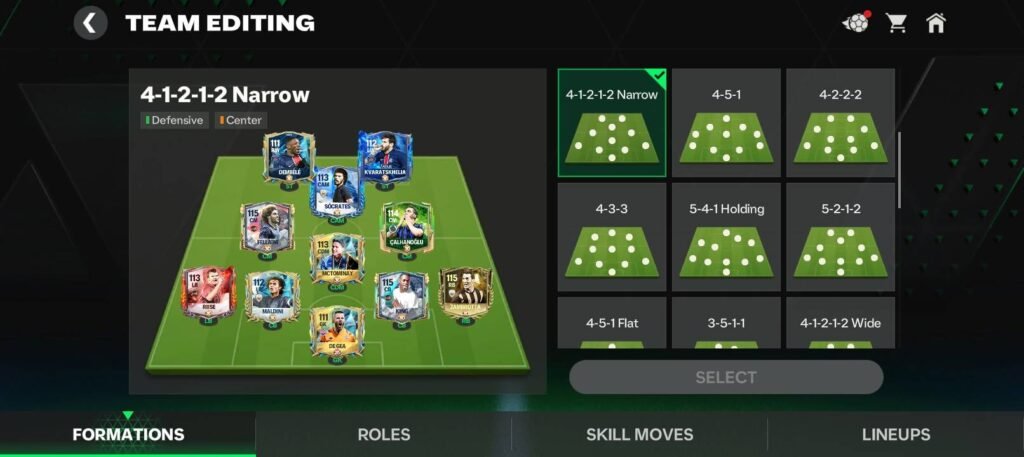
📌 4-1-2-1-2 Narrow
A strong central-focused formation for counter attacks and aggressive gameplay. Ideal when you have strong midfielders and high work-rate attackers.
📌 4-2-4
A very aggressive formation. Use only if you’re confident with your attackers. Make sure to balance with very solid defenders and consider switching to defensive tactics once you’re leading.
| Tactics / Formations | Offence | Build Up | Defence |
|---|---|---|---|
| 4-2-3-1 Narrow | 2-1-3-Free | 2-1-Attacking-Free | 3-1-2-Cover |
| 4-3-3 Attack/Holding | 1-1-2-Free | 2-2-Attacking-Free | 3-2-2-Cover |
| 4-1-2-1-2 Narrow | 1-1-3-Free | 2-1-Attacking-Free | 3-2-3-Cover |
| 4-2-4 | 1-1-2-Free | 2-1-Attacking-Free | 2-2-2-Cover |



📝 Conclusion
In conclusion, Manager Mode can be a fun and stress-free Division Rivals game mode if you make the right decisions.
Always ensure you are following all the tips provided in this guide — success is not guaranteed if you only follow a few.
Start by understanding the key MM tips, how matchmaking works, and how promotion/demotion functions. Once that’s clear, you can begin experimenting with your team, tactics, and timing.
With the right setup, your road to FC Champion — or even Top 250 — becomes much easier.
Watch other our other GUIDES at ➡HEAD TO HEAD, VS ATTACK
Best of luck, Believers! Go conquer Manager Mode and enjoy the journey!

Will the tactics for 4-3-3 holding/attack work for 4-3-3 formation.
Hello Believers, hope this guide is helpful to you bros!!!
It was very helpful, same as all your videos, thanks 🙏 bro!
What about 442 formation tactics
UNBAN ME